In meeting menu options
When you are in a meeting, the web app provides you with options to manage participants and control your meeting and audio and video from other participants. You can do the following:
View and manage participants in the meeting
Change layout for presentation and video
Open your presentation in a new window
Manage other participants' audio and video in a meeting
Admit participants to a locked meeting
View meeting in full screen mode
Note: The options shown in your app may depend on the permissions enabled for you by your administrator.
Meeting controls
Toggle your microphone: Select to mute/unmute your microphone during the meeting.
Toggle your video: Select  to enable/disable your video during the meeting.
Raise your hand: Select  to raise your hand during the meeting to ask a question or make a comment. Once you raise your hand, the hand icon appears besides your name in the Participants list.
Note: The raise hand icon is available only when the feature is enabled on the Meeting Server.
Share an application or your screen: Click  to start sharing your screen or application. The browser may prompt you to allow screen sharing. You can click on the pin to keep it open whilst you are presenting in the meeting.
Share content audio while sharing your screen: When sharing the entire screen, enable Share System Audio in the browser prompt to share the content audio along with video. When sharing a Chrome tab, select Share tab audio.
When the participant shares the screen, a speaker icon  is shown on presentation preview and
  icon besides the presenter’s name on participants list.
When a web app participant remotely mutes the presenter, both presenter’s mic and presentation audio are muted. If participant unmutes the presenter, only presentation audio is unmuted. Presenter must unmute manually to share their microphone’s audio.
On a Macintosh system, the participants can only share the browser tab. While sharing the browser tab, select the Share tab audio to share the content audio of the browser tab. The participants cannot share the content audio when they are sharing the entire screen. System audio share is blocked by the Operating System.
Note: Content audio can be shared only when using the latest versions of Chromium-based browsers.
Leave or End meeting: Click  to leave the meeting. If you chose to leave the meeting, others in the meeting can still carry on. However, if you have the permissions, you can end the meeting for all participants.
View and manage participants in the meeting
You can do the following:
View participants and status
Click  to see the list of participants who are currently in the meeting. The number indicates the total number of participants who are currently in the meeting. The icons next to the participant's name in the list indicate the audio / video status of a participant. Here are a few examples:
-
 - the participant is muted.
 -
 - the participant is speaking or their background audio can be heard.
 -
 - the participant's video is disabled.
 -
 - the participant is presenting or sharing content.
 -
- the participant is sharing content with audio.
- - the participant has raised hand.
-
 - the participant's camera is being controlled
Click on a participant's name in the Participants list to view the options available. Depending on the permissions available to you, you can do the following:
- Mute / Unmute audio - Mute or unmute the participant.
- Disable / Enable video - Enable or disable the participant's video.
- Make important - The important participant is displayed more prominently on the video layout.
- Drop a participant - Remove a participant.
- Change role - Change the role of a participant during a meeting.
- View Camera Control - Control a remote participant's camera.
Add SIP Participants
To add a new SIP participant to the meeting, do the following:
- Click
 . The Add participant pane opens.
 - Dial SIP participants with their video address or number.
Note: Directory search applies only if you are signed in to web app.
Drop a participant
To remove a participant, click on the participant's name and select Drop a participant.
Change a participant's role
To change the role of a participant during a meeting, click on the participant's name, select Change role, then select the role. When a participant's role is changed, the participant is notified with a pop up message.
These roles are defined in Meeting Management or through Meeting Server API.
Control the camera of other participants
Participants with appropriate permissions can control the camera of other participants that support far end camera control (FECC).
To control the camera of a participant, click on the participant's name, select View Camera Control. An overlay with the participant's name and control options appears. You can use the navigation keys to move the camera left, right, up or down and use the zoom keys to zoom in or out. To stop the camera control, close the overlay.
Change your layout for video and presentation
Click  to select a different layout for video and presentation. This choice only affects what you see on your screen. If Custom layout button
  is highlighted, it implies that the layout is assigned by the Meeting Server admin. Permission to change web app layout is enabled by Meeting Server admin.
Resize the presentation and video pane
You can increase or decrease the size of the shared content and the participants' video. Hover between the shared content and the participants video to see the resize icon  . Drag the resize icon up or down to resize the shared content and the participants' video. Resizing the shared content resizes the participants' video proportionately.
Open a presentation in new window
During a meeting if another participant is sharing a presentation or screen, you can now open this in a new window. Click  to open the presentation or screen in a new window.
Pin presentation preview
If you are sharing a presentation or screen you will be able to pin the pane which shows the preview of the content shared on your screen. Click  to pin your presentation. This prevents the pane from disappearing when you are not interacting with the app.
You can also click and drag the presentation pane and position it where ever you want on the screen.
Recording and streaming
Click  to open the Call controls pane to open the recording and streaming controls:
- Click
 to start recording, the icon changes to blue. Click again to stop recording.
 - Click
 to start streaming, the icon changes to blue. Click again to stop streaming.
If a meeting is being recorded or streamed, recording and streaming notifications will be shown on the web app's screen.
Lock or unlock a meeting
You can lock a meeting for security purposes to temporarily restrict guest access. Restriction only applies for the duration of the meeting. Click to open the Call controls side bar. Select Meeting lock.
If a meeting is locked or unlocked, notifications will be shown on the web app screen.
Admit participants to a locked meeting
You can now admit participants to a locked meeting if you have the appropriate permissions. Participant trying to join a meeting will be waiting in a lobby and will see an onscreen message indicating the same.
Web app shows you a notification if there are some participants waiting to be admitted to the meeting. The participant icon shows a count of number of participants waiting in lobby. Click on a participant's name and select Admit to meeting to admit participants individually. To admit all participants, click Admit all.
Manage other participants' audio and video in a meeting
Click to open the Call controls pane, you can mute or unmute the audio, and enable or disable video for all participants in the meeting.
Click Mute to mute audio for all participants. Click Allow to unmute audio for all participants.
To mute audio for individual participant, click on their name from the participant list and click Mute audio.
Click Disable to disable video for all participants. Click Allow to enable video for all participants.
To stop the video for individual participant, click on their name from the participant list and click Disable video.
View call information
During a meeting, you can click  to view the following information:
- Space name: Name of the space where the meeting is ongoing.
- Duration: Time since a participant joined the meeting.
- Join information: You can invite more participants to the meeting using one of the following ways:
- Copy the join link to your clipboard.
- Click
 to open the preview of the invite, you can either click Open email to open your default email with the joining information embedded or click Copy to copy the invite with all details to your clipboard.
- View media statistics: The audio, video, and content share statistics of an ongoing meeting is displayed in Call information > Media Health Statistics.
Media Health Statistics displays the following information:- Audio statistics: Jitter, Packet loss, and Codec negotiated.
- Video statistics: Jitter, Packet loss, Codec negotiated, Resolution, and Frames per second.
- Content share metrics: Jitter, Packet loss, Codec negotiated, Resolution, and Frames per second.
- Mute notifications: Web app will notify the participants regularly about the network health. Select the Mute notifications check box to turn off the network health status notifications.
- The network health status is displayed on the web app screen during the meeting. The table below lists the health status icons and messages displayed on web app screen.
| Statistics icon | Health | Health messages / Notifications |
|---|---|---|
|
|
Good | You are having the full meeting experience. |
| From Poor/Bad to Good | You are having the full meeting experience. You may turn on the video. | |
|
|
Poor | Issues may be limiting your meeting experience. |
|
|
Bad | Meeting experience is being limited. |


If enabled in the Meeting Server, web app prioritizes audio over content share and video in all scenarios of unstable network. For example, if the network connection during a meeting is poor, web app automatically turns off the video. If the network continues to deteriorate, the content sharing is turned off. Web app will always prioritize audio over content share over video and therefore, turns off the video, followed by content share, while retaining audio in all scenarios. This feature is enabled by default.
Report an issue
If you have a problem during the meeting, click  to send a report. This will collect all the diagnostics information which can be used to troubleshoot by support, optionally you can enter a description of your problem in more detail.
View meeting in full screen mode
Click  to switch to full screen mode during the meeting. To switch back, click
  . This option is only visible if your browser supports this function.
Note: Safari browser does not currently support this function.
The self-view pane
The self view pane shows a glimpse of how others see you during a meeting. web app provides you following options to manage self-view:
Pin self-view
-
You can pin the self-view so that its always visible. Click to disable automatic hiding of the self-view window. This prevents the self-view pane from disappearing when you are not interacting with the app. The icon changes to blue, click again to enable automatic hiding of the self-view window.
On mobiles or tablets, tap
 >
>  to pin self-view.
Change camera or microphone during a meeting
- You can change the camera or microphone during a meeting. Click
 from self-view pane to choose a different camera or microphone during the meeting.
- From mobiles or tables, tap > change camera to change between the front and back cameras.
Mirror self-view
- Select > Mirror self-view, to see your self-view video in mirror view for a more natural experience. In mirror view, your self-view video appears as if you were looking at your reflection in a mirror. The left and right sides of your image appear to be reversed. If you don't want your self-view video to appear reversed, you can stop showing it in mirror view.
This choice will be saved for future meetings on the same device.
- On mobiles, tap
 > Mirror self-view to use this option.
Note: Regardless of whatever you choose here, you video will appear as non-mirrored to other participants in the meeting.
Enable HD mode
- Select > Enable HD if you want to enable HD option. Click the toggle to disable it. This changes the camera resolution that is sent and turning off HD can help save CPU power and battery. By default, the HD mode is enabled on desktop.
- From mobiles and tablets, tap > Enable HD or Disable HD to disable HD. This changes the camera resolution that is sent and turning off HD can help save CPU power and battery. By default, the HD mode is disabled on mobiles and tablets.
Optimize content share in a meeting
To share screen in 1080p resolution, open self-view settings and select  Optimize for Text check-box under Sharing.
If left unchecked, the content will be shared as per the resolution set by the administrator. Until changed, your preference for Optimize for Text is saved and used in subsequent meetings.
Note:
-
When Optimize for Text is enabled, web app will override any screen share resolution set by the administrator in Meeting Server and the screen is shared in 1080p resolution.
-
You must restart the screen share after selecting Optimize for Text for the screen resolution to take effect. Web app also notifies the participant with an onscreen message to restart the screen share.
-
The screen resolution is set only on the sender’s screen while sharing screen.
Use a virtual or blurred background in a meeting
Blurring the background makes participant's surroundings appear out of focus hence hiding the details behind them. The intensity of the blur can be changed using the slider bar. Virtual backgrounds enable participants to change their background with one of the preset backgrounds during a meeting. Participants can use a virtual or blurred background only after they have joined the meeting and not on the preview page.
-
To blur your background in a meeting, click
> Blur  . Use the slider bar to change the intensity of the blur. Blur slider has 4 levels of intensity: 25%, 50%, 75%, and 100%. Default blur level is set to 50%.
 -
To use a virtual background, select
 Images, select a background from the available thumbnails.
 -
To remove the blur or virtual background, click
> None  .
.
To preview your video before applying a virtual or a blur background, disable the video then apply Blur or the preset image. The preview is displayed on the self-view. Your video with a virtual or a blur background is visible to other participants only when you turn on your video.
Blur and virtual background are supported on latest versions of Google Chrome, Mozilla Firefox
Note:
Background Blur works best with systems having Graphics Processing Unit (GPU).
The following minimum system configuration is required to use the Background blur feature:
For Windows systems: Memory - 8 GB and 4 core CPU
For Mac systems: Memory - 8 GB and 4 core CPU
Active speaker label
The active speaker label displays the name of the speaker. It is placed above the self-view pane and can be moved around the corners of the browser along with self-view. Click to have the active speaker label visible all the time. The icon changes to blue, click to allow it to hide after inactivity.
When none of the participants are speaking the active speaker label is displayed as Nobody. If the participant themselves are speaking, the self-view of the active speaker label is You.
In-meeting chat
Participants in a meeting can send chat messages to other participants in the same meeting.
-
On the right menu panel, select
 Chat.
Chat. -
Select To: drop-down option,
-
Select a participant’s name from the list to send a direct message to the participant or
-
Select Everyone to broadcast a message to all the participants in the meeting.
-
-
Type a message and press Enter.
The chat messages are visible to participants currently in the meeting. The old chats will not be available if you leave, refresh, or rejoin the meeting.
A red dot on the chat icon  indicates unread messages.
Note: If you are unable to send messages on chat, it means that your chat permissions are disabled. Your meeting host can enable chat permission for you.
Take notes in a meeting
The participants with appropriate permissions can take notes and publish it to all other participants during the call.
To take notes during a meeting:
-
Click
 to start taking the notes. The Meeting Notes window opens.
 -
Click Take a new note and type the notes. You can perform following actions on the Meeting Notes window:
-
Discard – Clear all the text entered in the initial draft or any changes made to the published note.
-
Save – Download and save the notes taken during the call along with the time and time zone on the local drive.
-
Publish – Publish the notes to other web app participants on the call.
-
The edit icon  in the Meeting Notes window allows you to edit a published note and republish it during the call. If you navigate to other in-meeting options, click Go to Draft to go back to the notes.
If there are more than one note takers in a call and one of the note takers publishes a note while the others are taking notes, web app prompts the other note takers with the following options:
-
Load New - Discard the notes taken by the participant and view other participant’s notes.
-
Keep mine - Retain the notes taken by the participant and do not include the published note.
A red dot on the notes icon  indicates that a new note is published.
If the participants have unsaved or unpublished notes in draft, web app prompts the participant to Save or Discard the notes before exiting the call.
Enable closed captioning
If closed captioning is enabled for a meeting, all participants can choose whether they want to view closed captioning on the screen.
-
To view the captions for the meeting, click
 and select English (Simplified) from the drop down. The caption typed by a captionist in the meeting is displayed on the screen. You can also view the history of the captions on the Closed Captions window.
 -
To turn the closed captioning off, click
, then select No captions from the drop down.
If you are a captionist, you can type the captions for the meeting on the Closed Captions window. Click , then select English (Simplified) from the drop down and type the captions. The captions are visible to other participants in the meeting as you press the Enter key. To save the captions history to your local drive, click Save closed caption history.
Refer to web app Important Information Document for more details on closed captioning.
Content magnification
Participants can scroll, pinch, or click a button to zoom in and out on the content that is displayed on screen during a call.
-
Click
 to zoom in. Pinch in if you are using mobile or tablet devices.
 -
Click
 to zoom out. Pinch out if you are using mobile or tablet devices.
 -
Click
.svg) to restore the magnified content to its original view.
to restore the magnified content to its original view. -
Drag the mouse or pointer to pan window around.
File sharing
The participants with appropriate permissions can share files in a meeting. All participants in the meeting can view the shared files, if file sharing is allowed for the meeting.
To share files during a meeting:
-
Click
 , the File Sharing window opens.
 -
You can perform following actions on the File Sharing window:
-
Add Files - Add the files you want to share from your local drive.
-
Share - Share the added files to other web app participants in the meeting.
-
 - Delete the added file(s).
-
Note: The file sharing icon is available only when the feature is enabled on the Meeting Server.
A red dot on the file share icon  indicates that a new file is shared by other participant(s) in the meeting.
To download a shared file in the meeting:
-
 Download beside the file you would like to download.
Note: Once a file is shared, it cannot be deleted by the participants in the meeting. The system will auto-delete the files 12 hours after upload.
Surveys in a meeting
Participants with appropriate permissions can create surveys and view survey results in a meeting.
Meeting organizer(s):
If you are a meeting organizer, to create a survey during meeting:
-
Select
 Surveys on the side panel. Select Survey Dashboard > Create survey.
 -
Enter the survey title, question(s), and options. Select Save.
You can perform following actions in the
Surveys window:-
 Launch survey – Launch a saved survey.
 -
 End survey – End an ongoing survey.
 -
 View results – View survey results after a survey is ended.
 -
Edit – Edit the questions and options of the survey.
-
 Delete – Delete questions, options, or a survey.
-
Note:
-
You can add up to 5 questions in a survey. Each question must have a minimum of 2 choices and up to 4 choices.
-
A web app meeting can have multiple organizers. You can create multiple surveys and save them for later use during the meeting. However, multiple surveys cannot be launched simultaneously. You can launch only one survey at a time.
-
Survey is visible to the participants in the meeting only when you launch the survey. You can edit the survey only before launching it.
-
Only you can save/edit/launch/delete the survey that you have created.
-
Any one of organizers can end an ongoing survey and view results.
-
If you get disconnected from the meeting after launching a survey, you can rejoin and still perform all the actions on the ongoing and your saved surveys.
-
The survey results are anonymous. You cannot identify the participant’s name or the options a participant has chosen for a survey.
A red dot on the  Surveys icon indicates that a new survey is active/on-going. You can choose to participate or not participate in the survey. Organizers other than the one who created the survey, can also participate in the survey.
Participants:
To participate in an ongoing survey:
-
Select
Surveys > Take survey. -
Select the required response from the options provided for a question.
-
Select Submit your response to submit the survey.
Note:
-
You can only choose from the provided options for a question. Entering free text and selecting multiple options are not supported.
-
You cannot see what options you have chosen or edit your choices after submitting the survey.
-
You can take part in the launched survey even if you join/rejoin the meeting if survey is not ended yet.
-
Apart from signed-in users, guests too can participate in the surveys.
-
Refer Cisco Meeting Server web app 3.8 Release Notes for more details on Surveys.
Important note for Surveys and File Share features
Web app in-meeting features like Surveys and File Share might not work as intended if the certificates are not validated or if the service is not reachable. In such scenarios, web app shows a warning message. The link given in the warning message allows the web app user to validate the certificates.
Note: The certificates need to be validated only when the participant uses new web app features for the first time on a browser.
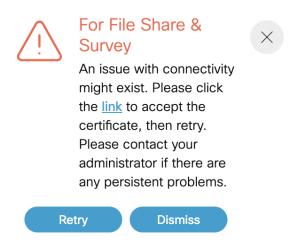
-
Click the link given in the pop-up.
-
A new tab will open and displays {"ping": "pong"} if there is connectivity.
-
Open the web app tab and select Retry in the pop-up to get the services back.
Please contact the Meeting Server administrator if the issue persists.